Showing posts with label Unit 30: Camera and Lighting Techniques. Show all posts
Showing posts with label Unit 30: Camera and Lighting Techniques. Show all posts
Thursday, 24 May 2018
Thursday, 17 May 2018
Shot type explanations
Shot Reverse Shot -
Shot reverse shot or also known as shot/countershot is a film technique where one character is shown looking at another character (the other character is more than likely off-screen), and then the other character is shown looking back at the first character.
180 Degree Rule -
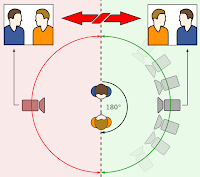
The 180 degree rule is a cinematography guideline that states that two characters in one scene should maintain the same left/right coordination to one another. When the camera passes over the invisible axis connecting the two subjects, it is called crossing the line and the shot becomes what is called a 'reverse angle'.
30 Degree Rule -
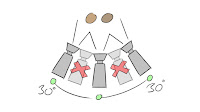
The 30-degree rule is a basic film editing guideline that states the camera should move at least 30 degrees relative to the subject between successive shots of the same subject.
Cut In -
In film a cut in shot is the interruption of a continuously filmed action by inserting a view of something else. It is usually, although not always, followed by a cut back to the first shot, when the cutaway avoids a jump cut. The shot is only on screen for no longer than 2-3 seconds.
Cross Cutting / Parallel Editing -
Cross-cutting is an editing technique most often used in films to establish action occurring at the same time, and usually in the same place. In a cross-cut, the camera will cut away from one action to another action, which can suggest the two actions are happening simultaneously. However it is not always the case.
Establishing Shot -
An establishing shot is usually the first shot of a new scene, designed to show the audience where the scene is taking place. It is usually an extreme wide shot.
Match On Action -
Or also known as 'Cutting on Action' is an editing technique or continuity editing in which one shot cuts to another shot portraying the action of the subject in the first shot. This creates the impression of a sense of continuity. The action carrying through creates a "visual bridge" which draws the viewers attention away from slight cutting continuity issues.
Temporal Overlap -
When an action is repeated from a different point of view.
Kuleshov effect -
A recognition that a shot’s meaning is not only dictated by what it contains, but by its relationship to other adjacent shots
Eisenstein Montage -
An approach to editing developed by filmmakers in the Soviet Union in the 20s. It emphasises dynamic, often discontinuous, relationships between shots and the juxtaposition of images. It’s primary focus was to engage with the viewer in an intellectual manner
Tuesday, 5 December 2017
Evaluation on my New Wave essay
I decided to study the French New Wave as I wanted to study how one movement within film drastically changed future film making. The French New Wave started this revolution of on scene shooting, using hand held cameras, having characters in the film talk to the audience and abstract editing techniques.
I decided to focus of film-maker Jean-Luc Godard as after watching a couple of his films, I took a considerable amount of knowledge and inspiration from him. As previously mentioned, I noticed there were several techniques which are used in film today. One of these techniques are jump cuts, which are thought to be invented by Godard himself. I used quick cuts and fast editing in my new wave film from the inspiration I gained from Jean-Luc Godard. I also used a hand held camera all throughout my film as you may be able to tell from the shakiness of the camera, but you may not be able to tell as much with the quick editing techniques I have used.
I think if I paid more attention to detail and wrote more notes about each film then I believe I could've made my work better in detail. If I used more books to further my research into Jean-Luc Godard, and the French New Wave then maybe I could've made more references which would've made my work better.
Monday, 27 November 2017
Camera Techniques; Aperture
Aperture refers to the size of the hole that lets in light through the lens when taking a picture or filming. The smaller the hole, the less light is let in. Each aperture setting has an 'F number' which refers to the amount of light being let in. Aperture also controls the depth of field which is the amount of sharpness behind and in front of the subject focus. The smaller the aperture the less sharpness in front and behind the subject focus. A larger aperture gives a greater amount of sharpness. Aperture is important for producing clarity and sharpness in film, it helps to enhance the focal point and emphasise certain aspects of a shot.


Camera Techniques; ISO
ISO is the level of sensitivity of your camera to available light. The lower the ISO number, the less sensitive it is to the light, while a higher ISO number increases the sensitivity of your camera. The component within your camera that can change sensitivity is called “image sensor” or simply “sensor”. It is the most important (and most expensive) part of a camera and it is responsible for gathering light and transforming it into an image. With increased sensitivity, your camera sensor can capture images in low-light environments without having to use a flash. But higher sensitivity comes at an expense – it adds grain or “noise” to the pictures.


Saturday, 18 November 2017
Camera techniques; Shutter Speed
Shutter speed is the measurement of time that light is allowed into the camera's shutter. This means that it effects the length of time that the camera is seeing the image it is picturing. Shutter speed, also known as “exposure time”, stands for the length of time a camera shutter is open to expose light into the camera sensor. If the shutter speed is fast, it can help to freeze action completely, as seen in the above photo of the dolphin. If the shutter speed is slow, it can create an effect called “motion blur”, where moving objects appear blurred along the direction of the motion. This effect is used quite a bit in advertisements of cars and motorbikes, where a sense of speed and motion is communicated to the viewer by intentionally blurring the moving wheels.

My own example;

Shutter speed - 1/30

Shutter speed - 1/250
Usually when filming the shutter speed it is better to shoot on 1/50 as 50 is two times the frames per second. Which means you should be shooting on 24 or 25 frames per second.
Although this is not the case depending on what you are shooting.
For example - shooting an athlete training or during a competition it is also better shooting on a fasted shutter speed. This will prevent the motion blur in which you can clearly see in my 1/30 shutter speed example.
Although if you wanted motion blur of a light source, such as; sparklers or cars the motion blur can make a really nice effect and look on your photograph or in your video.
Friday, 17 November 2017
Camera Techniques; Pull focus
Pull focus is when you see the foreground in focus then after a couple of seconds the foreground blurs and the background focuses. This can also work when the background is in focus first then the foreground comes into focus.
Film Example of pull focus - 10 Years a slave

My own examples;
1.

foreground focus background focus
This was an experimentation of pull focus and my first go but instead of it changing focal points, the whole shot goes out of focus instead.
As you can also see near the top middle of the shot there is some lens flare. Lens flare can be quite usual is some shots although not quite so much in my example.
2.

background focus foreground focus
This example of pull focus is a lot better than the first as you see the clear transition of the pull.
Film Example of pull focus - 10 Years a slave

My own examples;
1.

foreground focus
 background focus
This was an experimentation of pull focus and my first go but instead of it changing focal points, the whole shot goes out of focus instead.
As you can also see near the top middle of the shot there is some lens flare. Lens flare can be quite usual is some shots although not quite so much in my example.
2.

background focus
 foreground focus
This example of pull focus is a lot better than the first as you see the clear transition of the pull.
Health & Safety
It's a three step process
- Identify all the hazards
- Evaluate the risks
- Identify measures to control the risks
Weather
If you are filming outside all day, it is essential to make sure the crew are dressed appropriately. A lot of the time you may be standing around and people will get cold very quickly even in what seems quite mild weather. Layers of clothes are best, and get everyone to bring a waterproof and a woolly hat - they keep out wind as well as rain and are invaluable.
Sunburn and heatstroke are other outdoor hazards. Always have high protection sunscreen on hand. Try to get the crew to wear some kind of sun hat or stay in the shade when possible and make sure lots of water is available to drink. The other reason for sunscreen is to stop the actors' appearance changing drastically and messing up the continuity of the film.
Time pressure
Rushing to finish in time is when hazards get missed, or people start taking risks. If this starts to happen, take a moment to calm everyone down and remind them: this is only a film. If you feel really pressured try to think of how to lighten the work-load: can you cut out some shots or set ups to give you the time to get the most essential stuff for the film without a panic? Or can you come back tomorrow to finish?
Tripping hazards
Move or gaffa tape down cables and objects that could be tripped over.
Lifting hazards
Go carefully when moving or lifting heavy or dangerous things, ask someone to help you.
Camera risks
When a camera operator or cast member is walking during a shot, make sure they are comfortable with their route and there is nothing that could cause problems (a camera operator who needs to walk backwards for a shot should have an assistant to guide them and/or check their route).
Water
Shots that involve water.
Precarious
Shots from high up or near the edge of something.
Shots that look illegal
Shots might look illegal if you didn't know a camera was there. This could cause distress to members of the public and/or cause a police call out.
Release forms
Before commencing film making with young people you should obtain signed release forms from parents/guardians for everyone involved; this should also release them for photographs (and get it for animation films too, in case you use faces in the credits or the like). And remember you might want clearance to go on a school website (or vimeo - think festivals) so these should be covered too.
A letter with the release form, detailing the benefits of the project will encourage parents to say yes to their child being involved
Disclosure forms
Disclosure Scotland should be contacted if you are enlisting the help and practical support of others on the film project to work alongside young people. Enhanced Disclosure forms will certainly be held by most professional filmmakers and project facilitators.
Food
Feeding your crew, and keeping everyone hydrated makes everyone work better. If you organise food at a set time (aka catering), it is a good break for everyone. Food doesn't have to be fancy, a simple pizza delivery can boost flagging energy levels and raise morale.
Thursday, 16 November 2017
Scenarios and Setups
Summer Task: Part B
A. A small documentary where portability is paramount;
Equipment -
C. Night time Shoot
A disadvantage to shooting in the dark is the risk of grainy footage which may not be fixable in editing, this is why you need to ensure that the set up is done correctly. The video above highlights tips that can be used to enhance the clarity of your image even in very dark settings.
A. A small documentary where portability is paramount;
Equipment -
- Middle ranged SLR + Lense (18-55mm)
- Tripod
- (Microphone)
- Subject Matter
- Spare Battery
- Slider
- Barn door portable light
- GoPro
- Reflector
The setup for this documentary would be to follow a chosen student throughout their day to capture how much time they must spend doing work, revising and/or just messing with their friends. The day would start "early" morning where natural lighting will be used to capture the morning in all its glory. The only time a barn light may need to be used is towards the evening if the student is still with their friends or studying at home indoors.
Advantages of this set up would be that very little equipment is needed and natural lighting would be a great as my theme is very much the 'real life' of an athlete. Disadvantages would be that the film might look a little armature as I would not be able to carry around a lot of equipment as I follow a person through their day.
B. 'Talking Head' style interview
The setup for this should be be fairly straight forward with the camera set up eye level to the subject who would be sat in front of a blank background with a two lights pointed towards them. Advantages of this setup is the clarity and stability, there is nothing complex going on and so less room for error meaning filming should go smoothly.
Equipment -
- SLR camera + lense (18-55mm)
- Tripod kit
- Plain backdrop
- 3 point lighting soft box
- Spare battery
- Mircophone
Setup -
- Eye level camera
- 3 point lighting
- Subject in front of plain backdrop
- Subject central to camera and backdrop

Pros;
- Clear speech/video
- Focused only on one
- Operated by one person (plain backdrop ensures that the focus point will not change)
- Eye level - more interactive
C. Night time Shoot
Equipment -
- DSLR
- Spare battery and memory card
- Tripod
- 18-55mm lens
- Portable barn light
- Microphone
A disadvantage to shooting in the dark is the risk of grainy footage which may not be fixable in editing, this is why you need to ensure that the set up is done correctly. The video above highlights tips that can be used to enhance the clarity of your image even in very dark settings.
Butterfly lighting
Butterfly lighting thought to project more glamorous and complimentary connotations than other techniques. As you can see it was often used when capturing portraits of 1950's female stars.
Set up:


Set up:

- Key light is positioned directly in front of the subject. (not in the way of the camera).
- They key light is about 2/3 foot higher than the subjects head and angled at a 70/80 degree angle so that the beams of the light go down onto the subject.
- The subject look and the body is positioned straight into the lens.

Edge Lighting
Edge or split lighting is slightly more dramatic then Rembrandt. It defines and separates one side of the face to the other. Edge light can add intense emotions to your portraits and is often linked to the 1950'sfilm genre, "Film Noir". It is a perfect example of high contrast lighting.
Set up:

 This is a screenshot produced from Jean-Luc Godard's new wave film 'Breathless' to hide the characters facial expression in the shadows.
(Examples to come)
Set up:

- Direct the subject body to 25 degree point
- The key light is positioned parallel to the subject, 90 degree, at the same height as the subjects eye level.
- The light is pointed at a 90 degree angle.
 This is a screenshot produced from Jean-Luc Godard's new wave film 'Breathless' to hide the characters facial expression in the shadows.
(Examples to come)
Rembrant Lighting
It is a common technique that is used in studio portrait photography. It can be achieved using one light or one light and a reflector.
Reflector = Fill light

Rembrant is a popular technique because it can create images with considered lighting by using a minimum of equipment. Rembrandt lighting is characterised by an illuminated triangle the eye of the subject, on the less illuminated side of the face. It is named after the Dutch painter Rembrant, who often used this type of lighting.
Set up:
 As you can see from this portrait of Cara Delevingne on the right side of her face there is the Rembrant triangle underneath her eye. This is a clear example of the popular technique.
Lighting
Lighting techniques can hugely influence the connotations of an image. Lighting effects are dependent on the:
1. angle the light is pointing at
2. height of the lighting in regards to the subject
3. the position of the light in regards to the subject.
Key words;
1. angle the light is pointing at
2. height of the lighting in regards to the subject
3. the position of the light in regards to the subject.
Key words;
- Back light
- Key light
- Contrast
- Highlights & Low lights
- High key
- Low key
- Fill light
- Degree angle of position of light
- Hard & Soft light
- Height of the light
Monday, 9 October 2017
Bristol Planning
12 HNC students have been split into 4 groups of 3 to produce a promotional video for Bristol. The promotional video we will be producing will be for people ages 16 years to 30 years.
Each group have a task to produce recordings of certain landmarks and small questionnaires to ask the tourists and residents of Bristol.
Each group will have 2 cameras, SD cards and a tripod (In each group) to produce the recordings we will need to produce the end result. Each group will also record footage of when we go out at night for food. (To show the nightlife) There are also Banksy art around the city, so which ever group is around the place of the art will have the role to go and record the art for the video.
We will then come altogether, share footage and all individually create our own promotional videos.
Group 1:
Cabot Tower
College Green
Banksy - Blackbeard to banksy
Group 2:
Millennium Square
Arnoifini
Thekla
Group3:
Clifton Bridge
Observatory
Banksy - The girl with the pierced ear drum / you don't need planning permission
Group 4:
Bear pit
Christmas Steps
Park Street
Banksy - Take the money and run / The mild mild west / Rose Trap / Naked Man
Subscribe to:
Posts (Atom)